This recipe should really be called “Roasted Cauliflower, Kale, and Sausage Soup” because the roasted cauliflower was the original star of the show. However, a trip to Market Basket and an ultra-friendly and flattering bagger changed all that. If you’re unfamiliar with Market Basket, it’s a grocery chain with no self-checkout. This forces you to interact with other humans, though barely because the cashiers are generally super fast. Now, this bagger was not going to let the efficiency of the cashier rob him of small talk. I got complimented on my candy cane face mask, my hot pink rain boots, and my Golden Girls print pants. (Upon reflection, I’m really flattered that someone found this outfit so appealing.) At this point, I have paid for my food and all my groceries are bagged – BUT – not my chicken sausage. The gentleman makes pointed eye contact, shakes the package, and says, “You’re getting this Hot Italian sausage, and I’m a hot Italian!” A mask could not hide the thunderstruck expression on my face. “Well, at least I used to be…” he finished. I smized, thanked him again, and skipped out of the store with my groceries. Sir, this soup’s for you.
Ingredients
12oz frozen cauliflower
1/2 Tbsp EVOO
1/2 onion diced
20oz hot Italian chicken sausage
32oz chicken bone broth*
2oz heavy cream
250g kale, chopped
2 cloves of garlic, minced
salt and pepper
Directions
Pre-heat oven to 425F.
Toss the cauliflower with the EVOO and salt and pepper. Spread on a baking sheet and roast 30-45 minutes, or until the cauliflower starts to brown.
In a dutch oven, over medium heat, crumble the sausage and cook until done. Remove the sausage add from the pot.
Add the diced onion and cook until the onions soften. Add the garlic and continue to cook, until the garlic is fragrant.
Now, add the roasted cauliflower and chicken broth to the pot. Continue to cook another 10 minutes.Transfer the ingredients in the pot to a blender. Blend until smooth.
Return the soup to the pot. Lower the heat and stir in the heavy cream. Add the sausage and kale. Continue to cook, stirring occasionally, until the kale has wilted. Add salt and pepper to taste.
Serve! Be fancy and sprinkle some red chili flakes on the soup.
* You can also use regular vegetable or chicken broth
I can confidently call these ‘ultimate’ brownies. Super thick layers, amazing flavors, and decadent AF. This recipe took a few iterations, but it was all worth it in the end. Special thanks to Jess, Chloe, and Jason for listening to me plan, stress, and for helping me brainstorm how to make these work.
Ingredients
Red Velvet Cake Layer
1 box red velvet cake mix
5 Tbsp unsalted butter, melted
1 large egg
2 oz water
Dark Chocolate Oreo Truffle Layer
8 oz cream cheese, softened
11 dark chocolate Oreos
Dark Chocolate Layer
1 cup dark chocolate chips
1 Tbsp coconut oil
Caramelized White ChocolateHearts
white chocolate chips
coconut oil
silicone heart mold
Directions
Start with the white chocolate hearts. Pre-heat the oven to 250F. Place the silicone mold on a baking sheet. Partially fill each heart mold with chocolate chips. Add a tiny dab of coconut oil to each mold. Bake for 45 – 60 minutes until the chocolate looks and smells toasted. Every 10 minutes, swirl the chocolate in the silicone mold. At times, the chocolate will get chalky or look burnt and crumbly. Just keep stirring and the texture will return. About halfway through, add additional chocolate chips to the mold, melting them into the half filled white chocolate. When finished, cool the chocolates on the counter.
Heat the oven to 350F. Spray an 8″x8″ pan with non-stick baking spray. In a mixing bowl, mix the cake mix, egg, and melted butter until combined. The batter will be super thick and a little dry. Add water and continue to mix until there are no dry spots. Bake for 20-30 minutes or until a toothpick inserted comes out clean.
While the brownie bakes, prepare the Oreo truffle layer. Break up the Oreo cookies into small pieces. (If you have a stand mixer, just break the Oreos in half and then beat them with the paddle attachment for about 15 seconds.) Stir the crushed Oreos into the softened cream cheese until evenly distributed. Set aside.
When the brownies are done, cool in the plan on a wire rack for 10-15 minutes. When the brownies are almost cool, spread the layer of Oreo truffle on top. Of course, if you actually used room temperature cream cheese, you’ve shown you have patience and you should just wait until the brownies have cooled completely before doing this step. However, I’m impatient, and my cream cheese wasn’t room temperature, nor do I want to sit around waiting for the brownies to cool. In my case, mildly warm brownie + mildly cold Oreo truffle filling = smooth spreading.
At this point, everything should be cool. Place the brownies and white chocolate hearts into the fridge. In a microwave safe bowl, add the dark chocolate chips and the coconut oil. Heat in on 50% power for 30 seconds. Stir and repeat until all the chocolate is melted. If the chocolate is 95% melted and you are worried about burning the chocolate, just keep stirring and use the heat of the melted chocolate to melt the remainder. Take everything out of the fridge and pour the melted chocolate over the brownies and smooth is out with a silicone spatula. Before the dark chocolate sets, press in the caramelized white chocolate hearts. Allow everything to set, this cut and serve to your favorite people, or hoard them all because if you can’t love yourself, how the hell you gonna love anyone else?
Redemption meal for the leftover collard greens I bought for New Year’s. I ate half the bag, made plans for the other half, and then I never got around to actually cooking them. So I’m starting 2021 by buying bagged lettuce and throwing it away. I almost made this with chicken broth until I realized all the ingredients were coincidentally vegan. So, I made this one for my vegan friends to enjoy when they come to visit.
Ingredients
1/2 onion, diced (150g)
2 stalks of celery, sliced (113g)
2 carrots, sliced (90g)
1.5 Tbsp EVOO, divided
10 ounces vegan chorizo (I used the Fear No Evil Fiery Mexican Chorizo)
2 cloves of garlic
15oz can of pink beans
4 cups vegetable broth
300g shredded collard greens
Directions
Heat 1 tablespoon of olive oil over in a non-stick pot or dutch oven over medium heat. Once the oil is hot, add the onion, celery, and carrots. Cook until the vegetables are fragrant.
Add the garlic cloves and continue to cook until the vegetables are softened.
While the vegetables cook, prepare the chorizo. Heat the remaining .5 Tbsp of olive oil over medium heat. Slice open the chorizo casing and crumble the sausage. Cook until… fragrant and crumbled I guess? And warm? It’s vegan chorizo, so it’s already “done”.
Turn off the heat and set aside
.Add the broth and can of unrinsed beans to the dutch oven. Bring to a boil, then let simmer for 5 -10 minutes to allow the flavors to meld.
Using a slotted spoon, remove about a cup of beans. Take the remaining soup, and add it to a blender. Blend until smooth and uniform.
Return the blended soup to the pot, return the beans and add the chorizo. Stir in the collard greens and cook until wilted. Season with salt and pepper to taste.
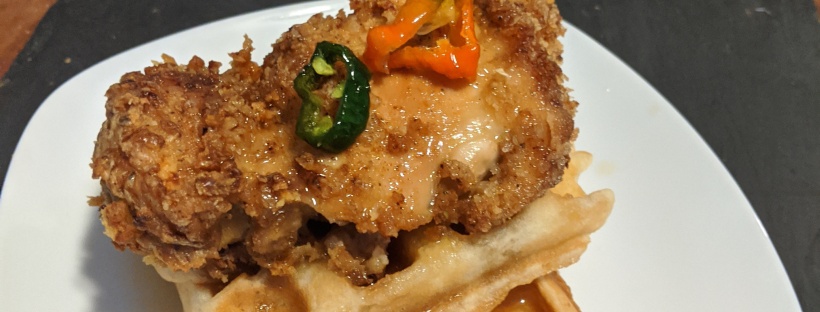
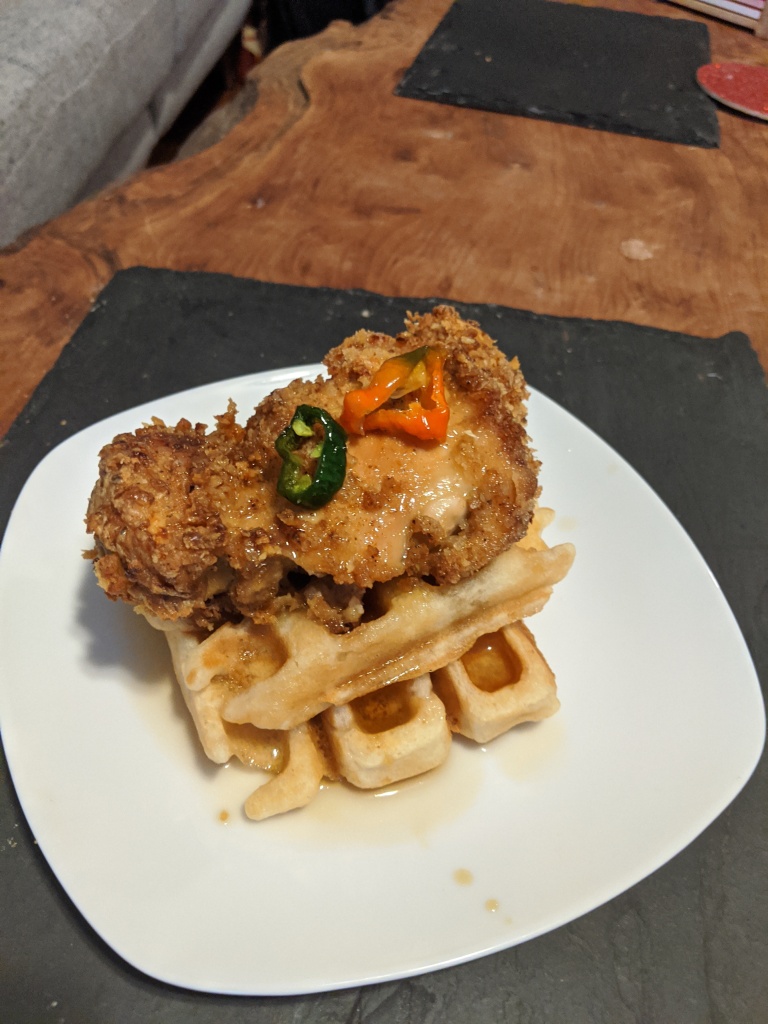
Quarantine cooking at its finest. I went to multiple grocery stores and none of them had chicken with skin! I was nervous about how this would turn out since 1. crispy skin is delicious 2. I wasn’t sure the flour would stick well without skin and 3. I was worried the outer meat would become more dry than crispy. But, we must make do with what we have, and thankfully, we had chicken thighs which tend to be nice and juicy. And also, extra panko which adds some extra crunch.
Ingredients
An Ode to Air Fried Chicken
1.5 pounds boneless, skinless, chicken thighs
1 cup buttermilk
1 cup all-purpose flour
1/2 cup panko
1 egg
KFC spice mix!
Pam
An Ode to Buttermilk Waffles
1 cup Aunt Jemima Complete Buttermilk Waffle Mix
3/4 cup water
1.5 ounces of vegetable oil
An Ode to Colonel Sanders
2/3 tablespoon salt
1/2 tablespoon thyme
1/2 tablespoon basil
1/3 tablespoon oregano
1 tablespoon celery salt
1 tablespoon black pepper
1 tablespoon dried mustard
4 tablespoons paprika
2 tablespoons garlic salt
1 tablespoon ground ginger
3 tablespoons white pepper
An Ode to Hot Honey
2 jalapenos
1/2 cup of honey
Directions
For the hot honey, heat the honey over medium heat.
Place the thinly sliced jalapenos in a jar. When the honey is warm and liquid, pour over the jalapenos and let sit at room temperature until cool. Allow the mixture to steep overnight. For a more mild honey, remove the jalapenos. For a more intense hot honey, leave them.
For the chicken, mix 2 Tbsp of the KFC secret spice mix with 1 cup of buttermilk.
Coat the chicken thighs with the mixture and seal in a Tupperware in the fridge overnight.
Stay up late watching Netflix and 2nd guessing your decision to use skinless chicken. Debate the merits of going to the store in the morning to look for skin-on chicken thighs on little sleep with people standing too close to you and ultimately not getting any chicken because the store is out of stock. Finally, convince yourself not to go. Not because of all the legitimate above mentioned reasons, but because then you won’t have time to brine the chicken, and brining is truly the most important part.
Turn your air fryer (I have a Ninja Foodi) on to the Air crisp setting at 360F and set the time to 25 minutes to allow it to preheat.
As the fryer preheats, mise en place! Set up 3 bowls. One with panko crumbs, one with the egg, beaten, and a third with the all-purpose flour mixed with 4 Tbsp of KFC spice mix.
Once the air fryer is ready, a piece of chicken and let the marinade drip off. Then coat the chicken in the flour, next dip it in the egg wash, and finally the panko*. Lightly spray both sides with Pam.
Place the chicken in your air fryer (in the crisper basket) and cook for 10 minutes. Do not let the chicken touch. I was able to do 2 thighs at a time. After 10 minutes, flip the chicken and cook another 5 minutes or until the internal temp of the chicken is 165F.**
Heat the oven to 200F. Throw your chicken into the oven to stay warm as you prepare your waffles.
For the waffles, pre-heat your waffle iron.
In a bowl, combine the pancake mix, water, and vegetable oil and stir until the large lumps disappear. Let the batter rest 5 minutes. (Now you will be sure your waffle iron is hot n ready!)
Make the waffles.
To serve, grab your waffle and place some chicken on top, smother in hot honey and syrup. Throw some jalapenos on top as a warning that this is spicy and also so it’s Instagram pretty.
* I did run out of panko. I had some thighs and also nugget sized thigh bites, so I just didn’t coat those in panko. It’s quarantine time, we can do this. ** I like to live on the edge. As long as it’s 155-165, I’m good. I also place the chicken in the oven at 250F after it’s done to keep it warm until dinner. *** Wow, it looks like the skinless chicken thighs really don’t cut the calories too much! This should probably serve 4. I had some leftovers, but TBH that was because I wanted to save room for cake later.
I finally made a soup that I can call cozy! This soup is pretty thick, which I like. And the broth almost feels like a nice, rich sauce. It’s not the best for when you’re sitting at home sick, but throw it in a mason jar, take it to work, microwave, plate and you have a sophisticated, elevated lunch.
In your dutch oven***, heat olive oil in a skillet over medium heat.
Once the oil is hot, slice open your sweet, sweet, Italian chicken sausage casing and put the goods in the pan. Crumble and cook.
Add in the onion, garlic, and seasoning. Cook until the onion softens and begins to turn translucent.Stir in the flour until it’s lightly browned. Then add the tomato sauce, and chicken broth. Stir until the tomato sauce and broth have come together as one.
Crank up the heat until the soup starts to boil. Add the kale, cover about 5 minutes until the kale starts to wilt and turn a vibrant shade of green.
Break up your cream cheese and stir in until it has fully dissolved into the soup. Add pasta, cook for 5 minutes.
*Use your favorite. I used sazon, but a garlic and herb seasoning or original Mrs Dash would work too. Basically whatever you have on hand will work. ** I used fresh pasta. If you use frozen and the instructions on your tortellini say it needs to cook for closer to 10 minutes instead of 5, add them before you add the kale, cook for 5 min, and then drop in the kale. *** See! I told you it was cozy. We are using brightly painted, enameled dutch ovens to cook this shit.
*Or how I learned to stop worrying about eating raw celery sticks with hummus and love chopping copious amounts of celery.
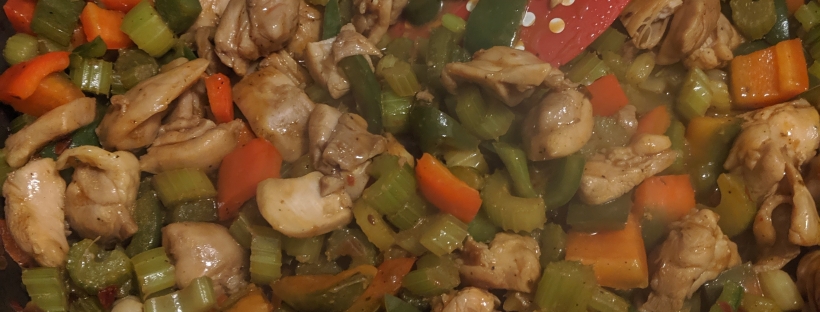
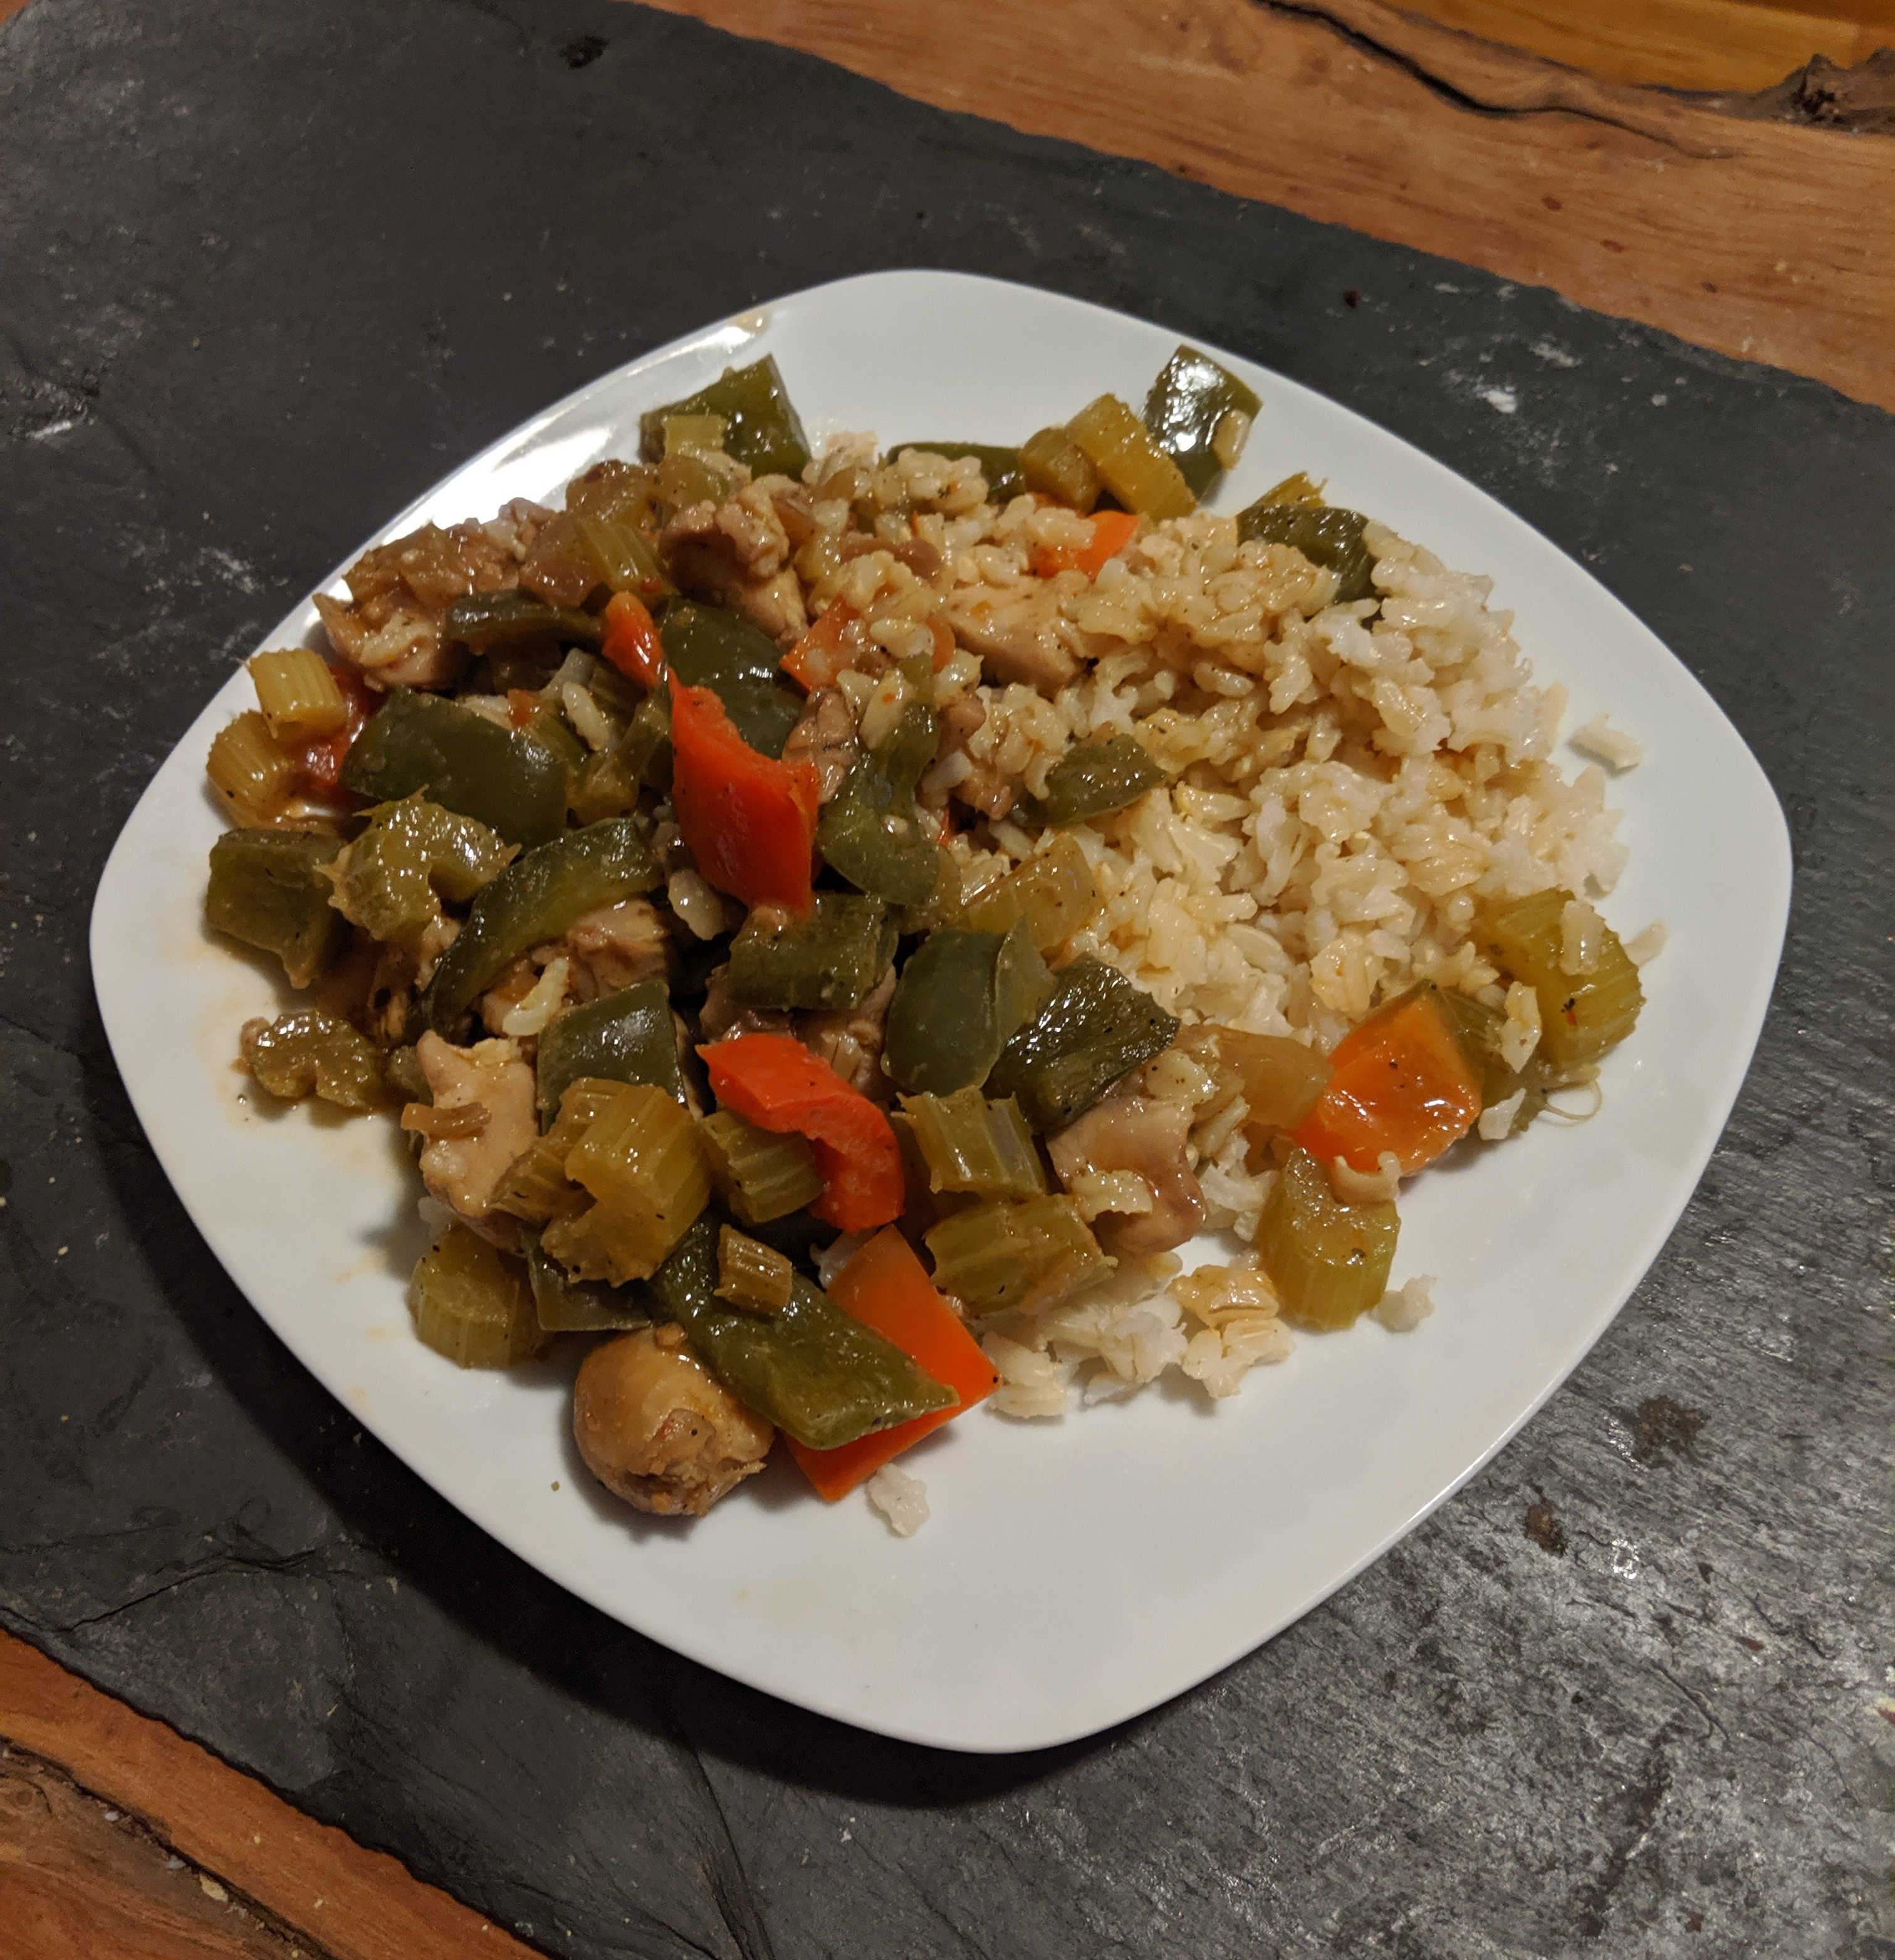
This recipe was inspired by a trip to Costco. I hadn’t been in years, but when my friend offered to take me to pick up a ham for Christmas, I was in there like swimwear. To be polite, I kept my browsing to what I felt was a minimum. This was my first trip to Costco where I didn’t browse every aisle. Or fill up the cart. What I did grab were pre-cut celery sticks! I love to eat them with hummus, but they rarely go on sale and I don’t like to cut my own sticks. (Shoutout to my misen knife making chopping celery a breeze!) And I got about half a million pounds and between all the Christmas celebrations, ate about four celery sticks with hummus. So I found myself with tons of celery threatening to die in my fridge, no hummus and no desire to eat celery soup. (Google, wtf?) Thankfully, I recalled that Kung Pao chicken has celery and well, here we are.
Ingredients
1 pound boneless, skinless chicken thighs cut into chunks
1 red bell pepper, sliced
1 green bell pepper, sliced
400g celery, sliced
3/4 cup brown rice*
1 Tbsp EVOO
2/3 Tbsp cornstarch
1 Tbsp dark soy sauce**
1 tsp sesame oil***
2 tsp minced garlic
1/2 tsp salt
1/2 tsp pepper
1 Tbsp sugar
1 Tbsp sake
1 Tbsp ACV
3 Tbsp chili garlic sauce (I used Wegman’s Tom Tom sauce)
Directions
Prepare brown rice according to the package.
Toss the chicken chunks with cornstarch, salt, pepper, sesame oil, soy sauce, and sake. Make sure all the chicken is coated. Set aside to marinate for 20 minutes.
Over medium-high heat, heat the olive oil. Once it’s hot and shimmering, add the garlic and saute until fragrant. Add the celery and bell peppers. Cook until bell pepper has softened. The celery will soften, but not as much.****
Push the celery and peppers to the side. Lower heat to medium and add the chicken along with any remaining marinade. Cook until chicken has been cooked all the way through.
Stir in the chili garlic sauce.
Serve over rice!
* Or white rice. The macros for white and brown rice are about the same.
** The crazy salty one
*** The dark, toasted one
**** Of course, I didn’t chop everything before this step, so I definitely finished all this by the time the chicken was done. Had you done all the chopping ahead of time, you will want to wait until there are about 5 – 10 minutes left of marinating time before starting all this. The upside was, it was perfect timing to finish all the food at the same time as the rice!
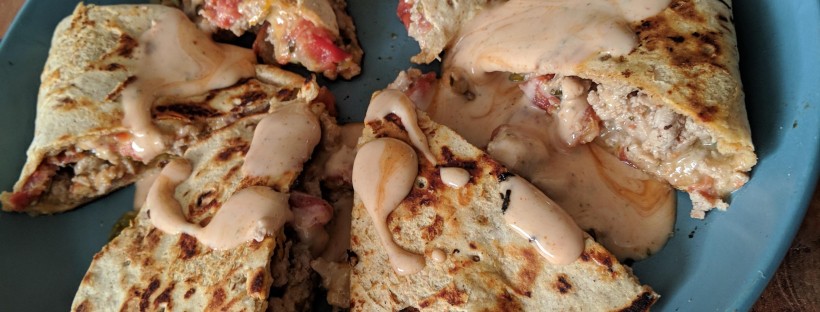
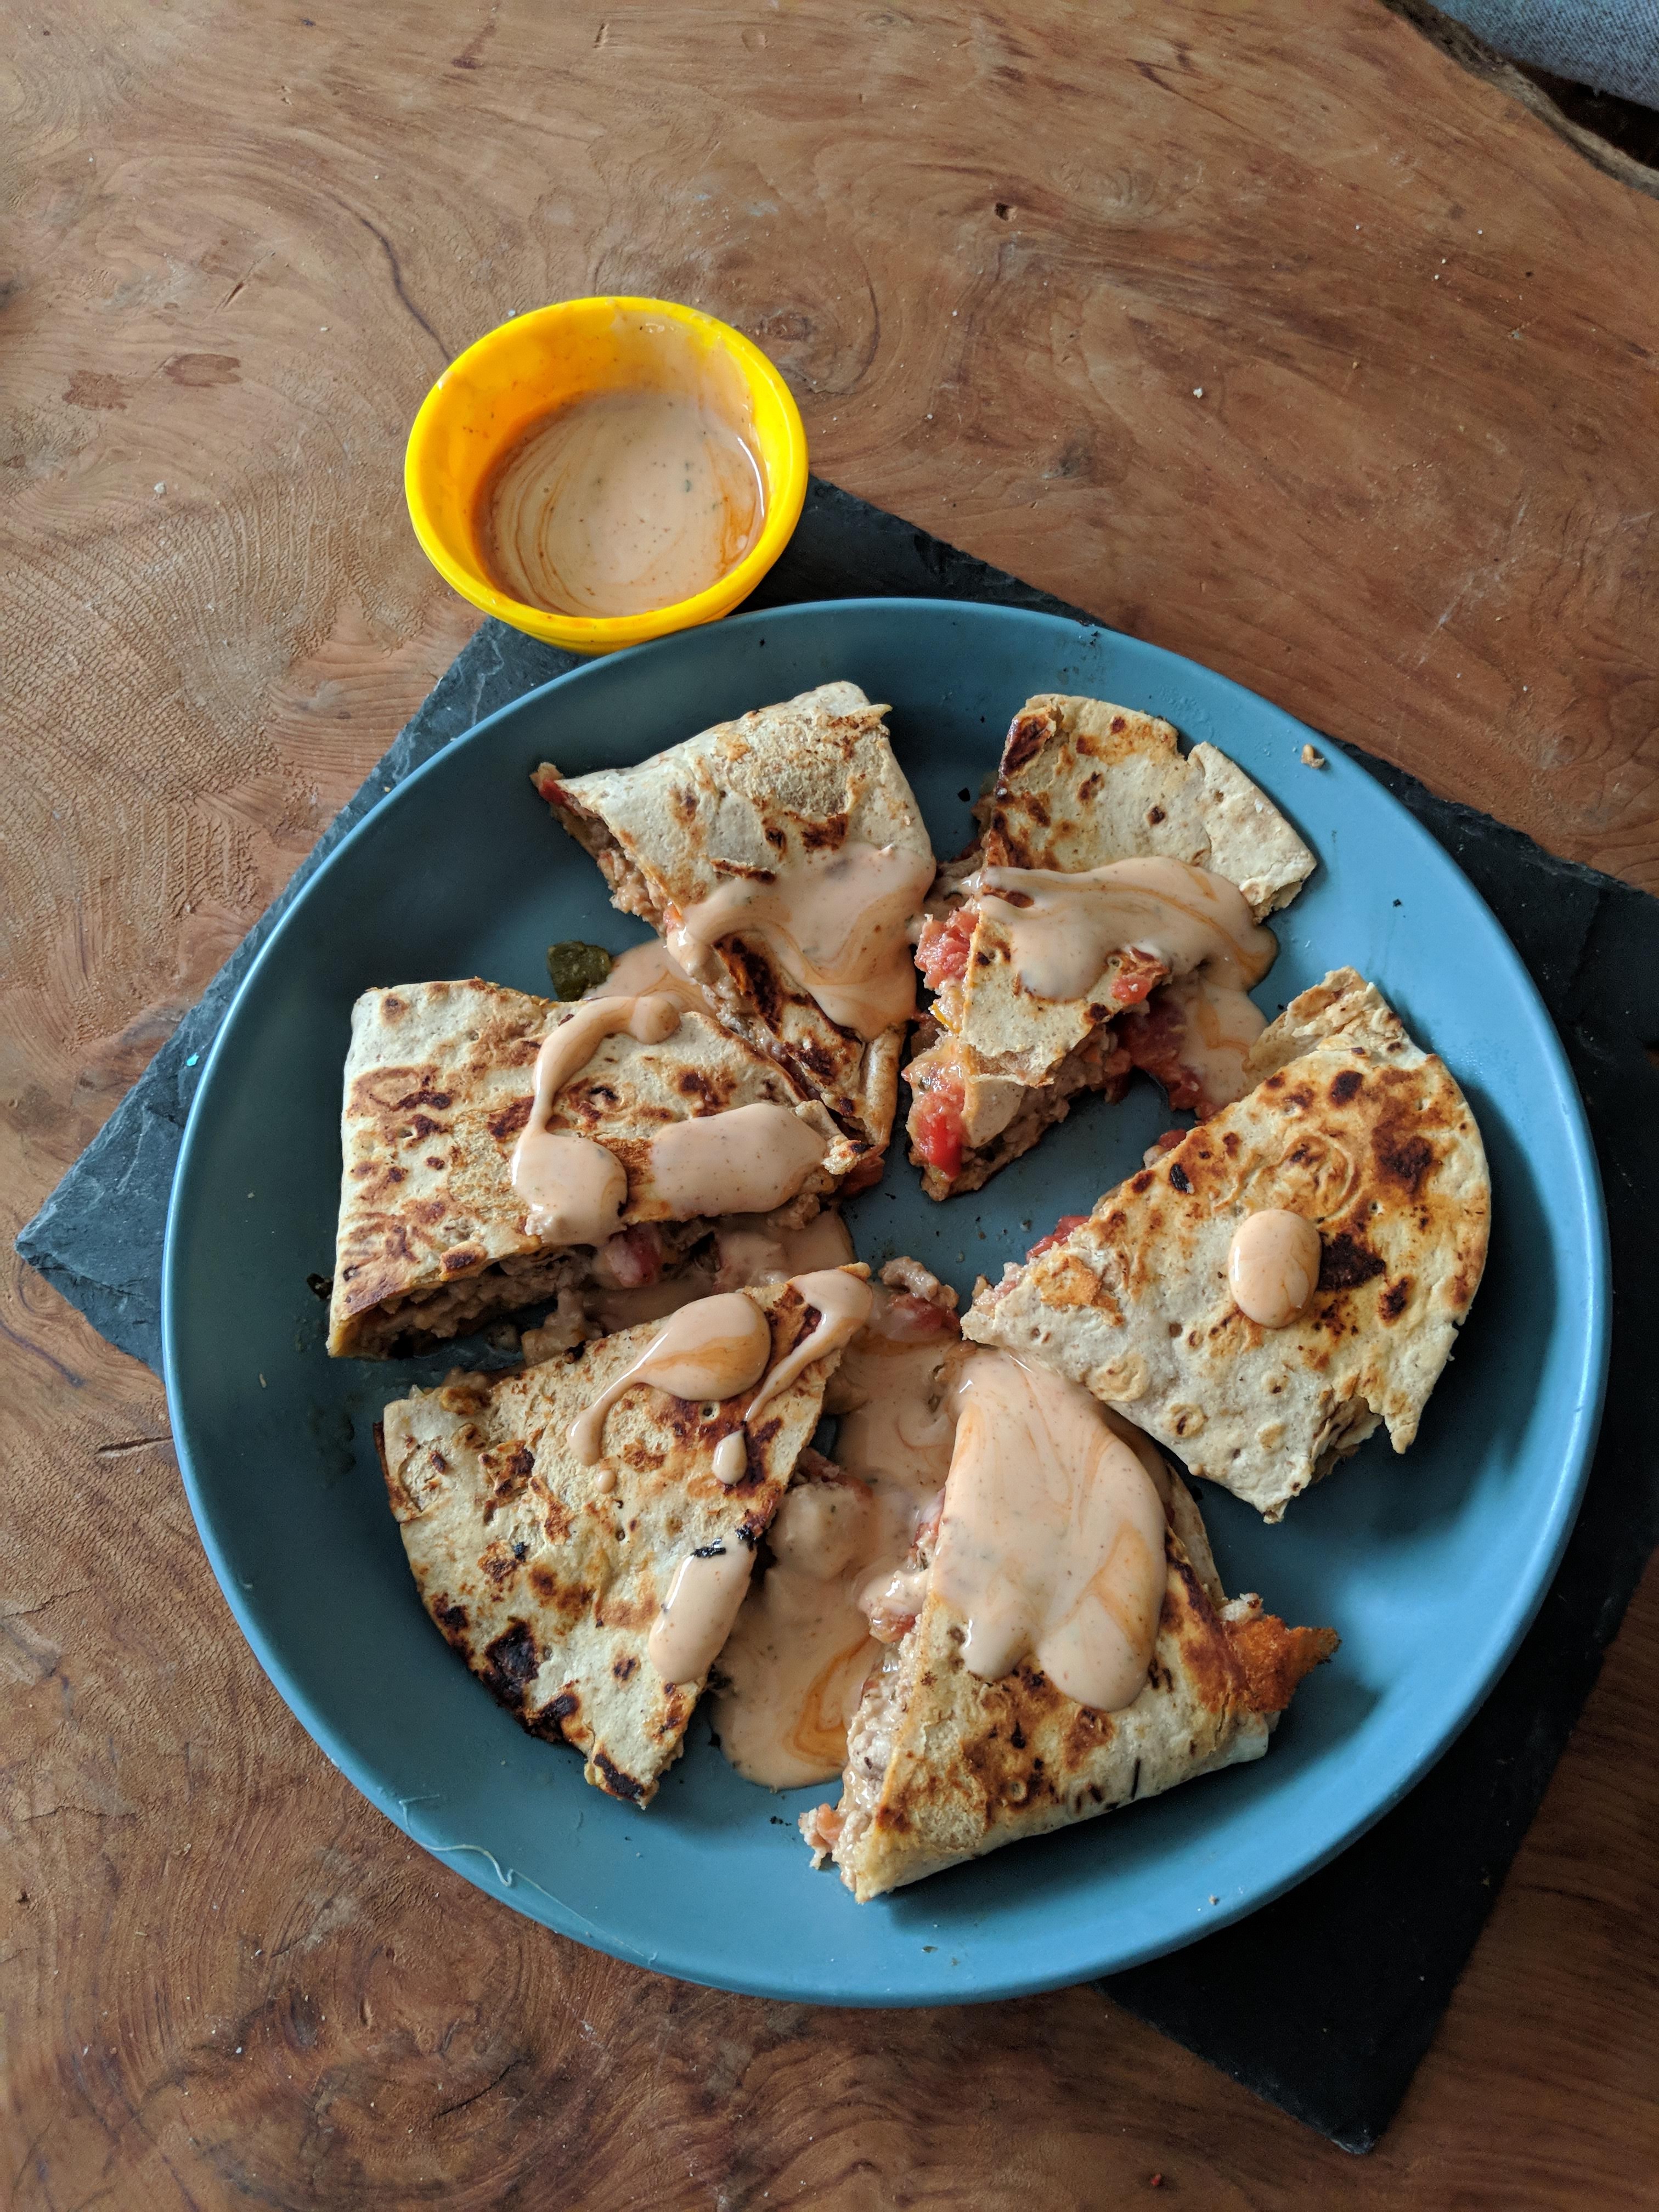
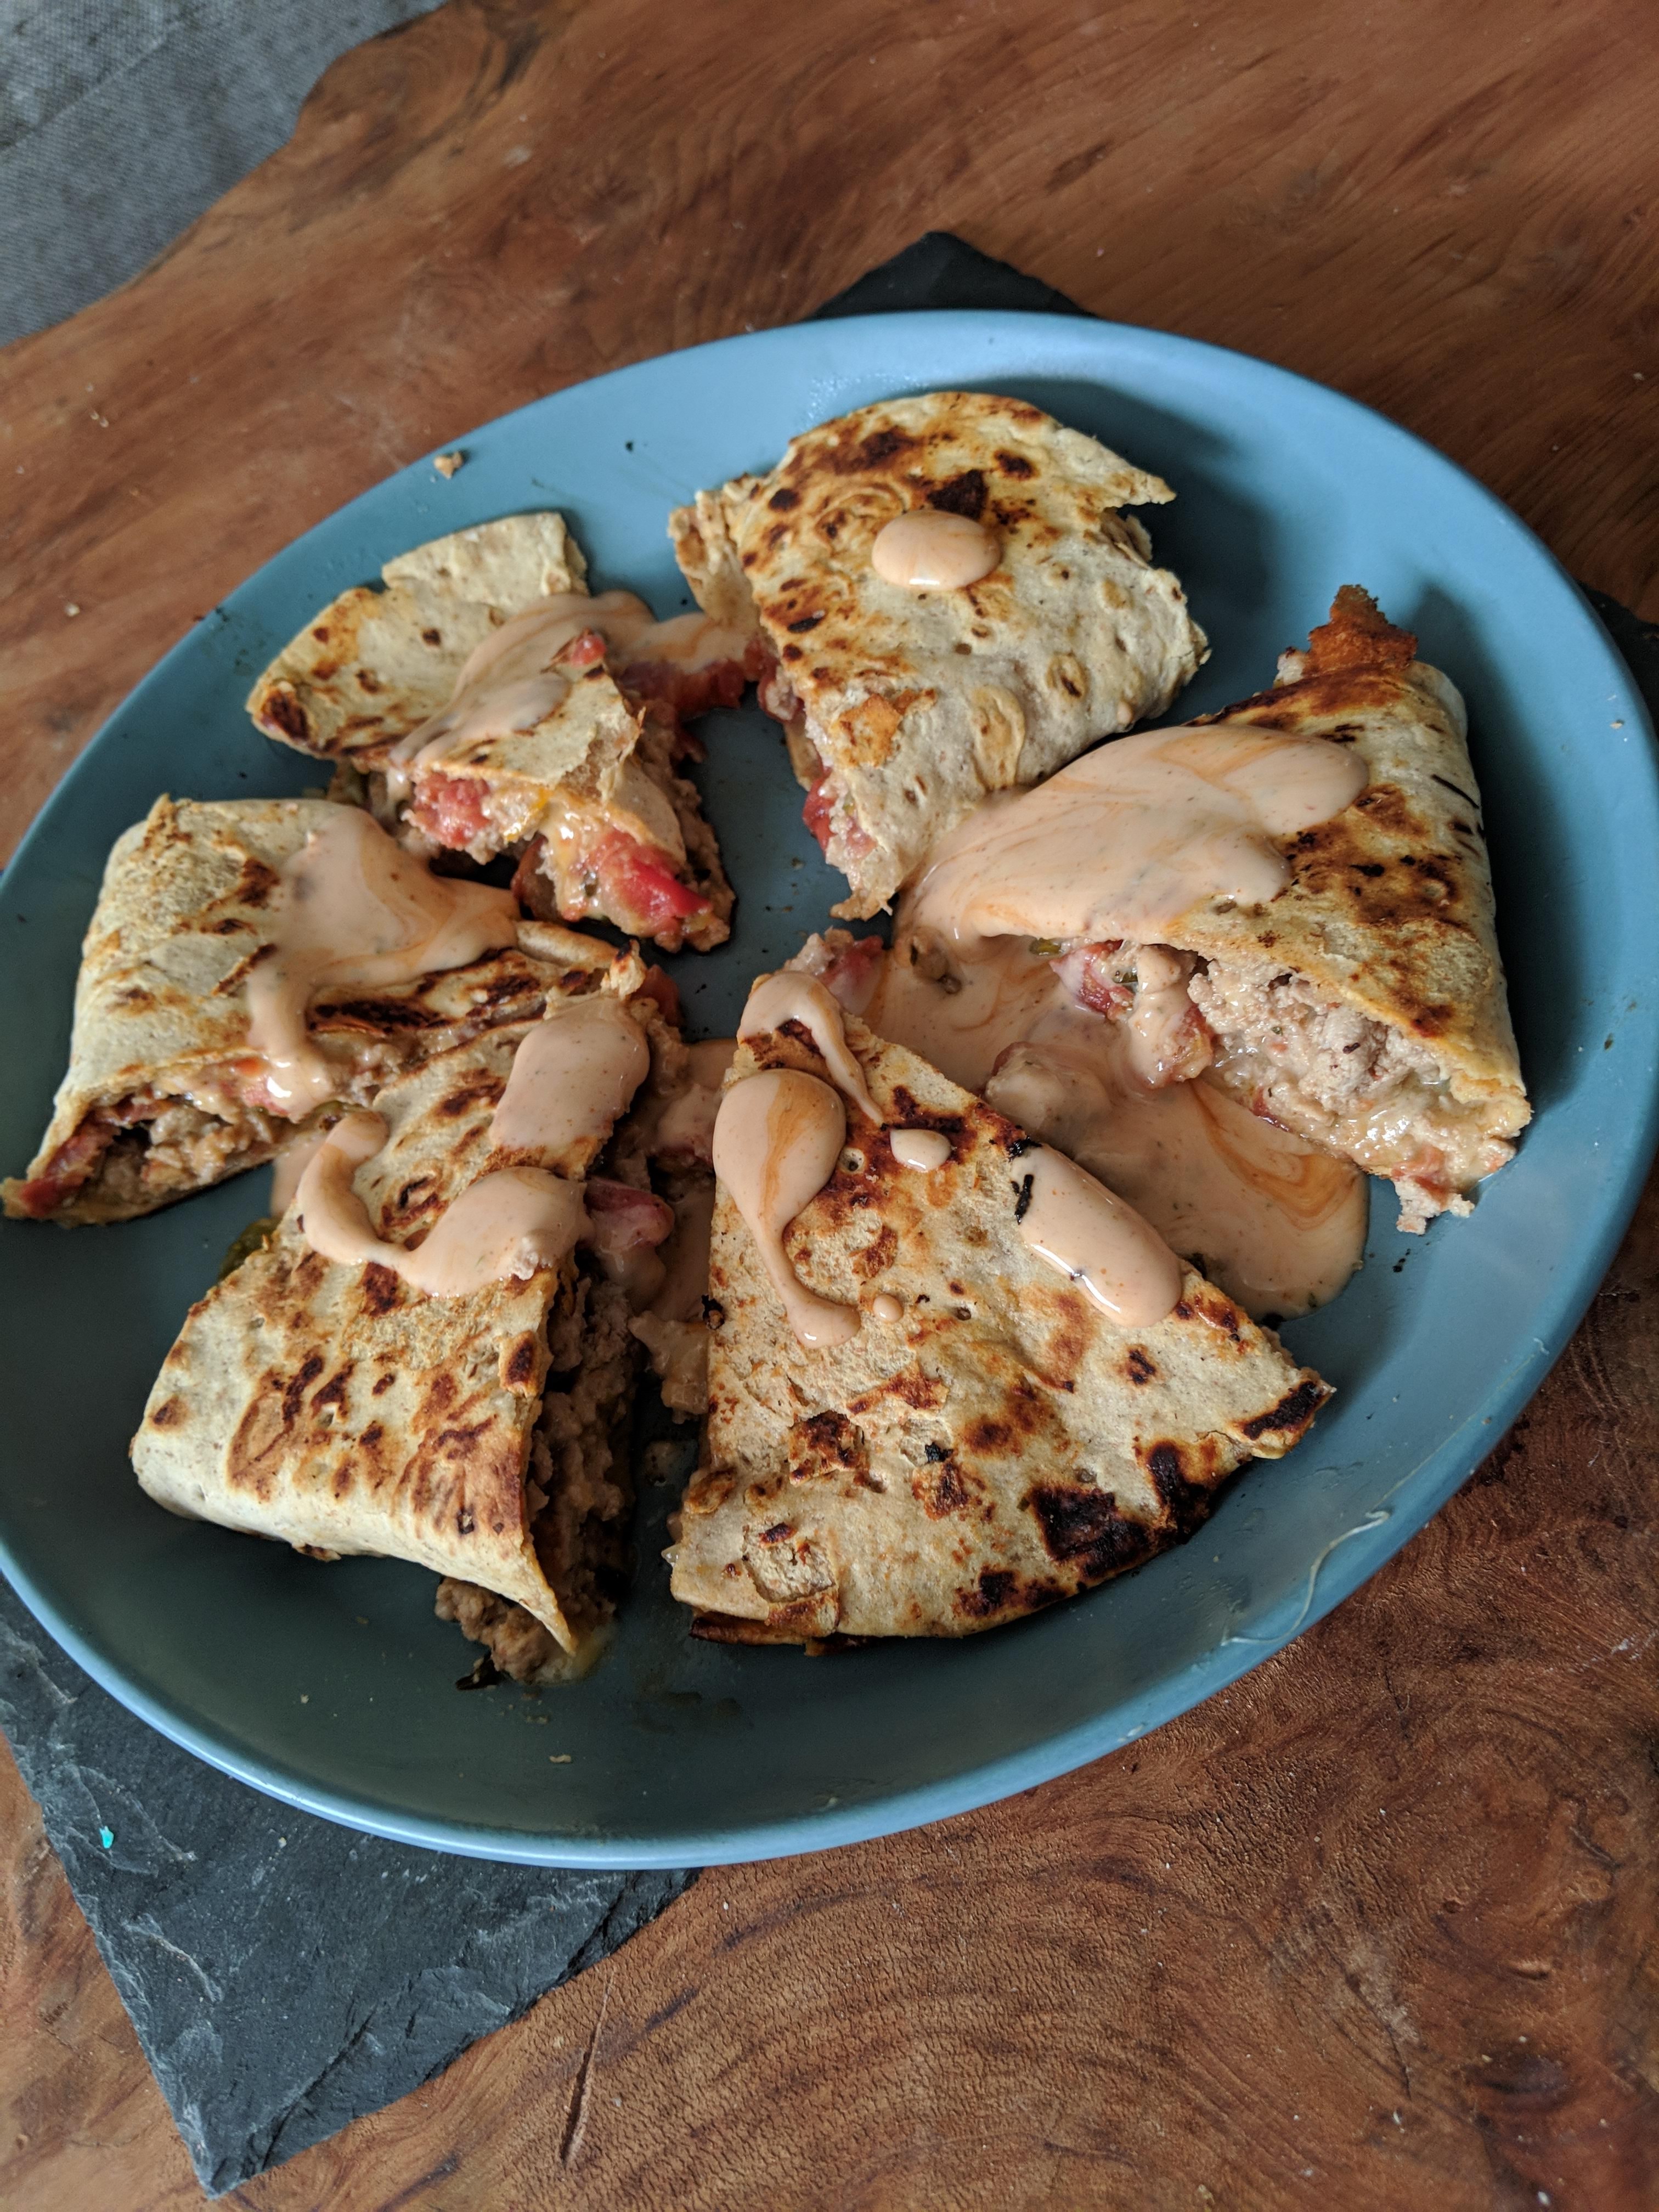
Super quick and easy! I was surprised when I looked at the clock and realized I was done in about 20 minutes! You’ll wind up with a bunch of leftover seasoned ground turkey. It was either that or have half a can of Ro-Tel tomatoes open and what would you do with them besides adding them to ground turkey? I guess you could make some killer queso dip, but you’d probably think the dip was a great way to use up the ground turkey too. I wound using mine for pizza and it was awesome. Do the same!
Ingredients
1 lb 93/7 ground turkey
1 can Ro-Tel fire roasted diced tomatoes with green chiles
2.5 servings of shredded Mexican cheese
4 flat-out wraps*
4 Tbsp Greek yogurt ranch dressing
2 Tbsp chipotle hot sauce
Directions
Spray a skillet with nonstick spray and add ground turkey. Cook over medium heat, breaking up the meat into crumbles. Once the turkey is about 75% done, drain the can of Ro-Tel and add to ground turkey. Continue to cook until meat is cooked through.
Transfer the turkey mixture from the skillet to a bowl.
Prepare tortillas!
Divide half of the turkey amongst the four wraps. Keep the meat on the bottom half, top with cheese, then fold the tortilla. One at a time**, place the tortillas on the skillet. Cook over medium-low heat until cheese melts and tortilla crisps, about 2-3 minutes each side.
While the tortillas crisps, prep the dipping sauce. Mix the ranch and chipotle. Taste and adjust as needed.
Once the quesadillas are done, slice and drizzle with half the dip. Use the rest for dunking!
* Or whatever low calorie, high fiber wrap you have
** Two at a time if your skillet is big enough and your quesadilla flipping skills are on point. I attempted that at first, but each flip, I lost some filling and was spending lots of time restuffing my quesadilla.
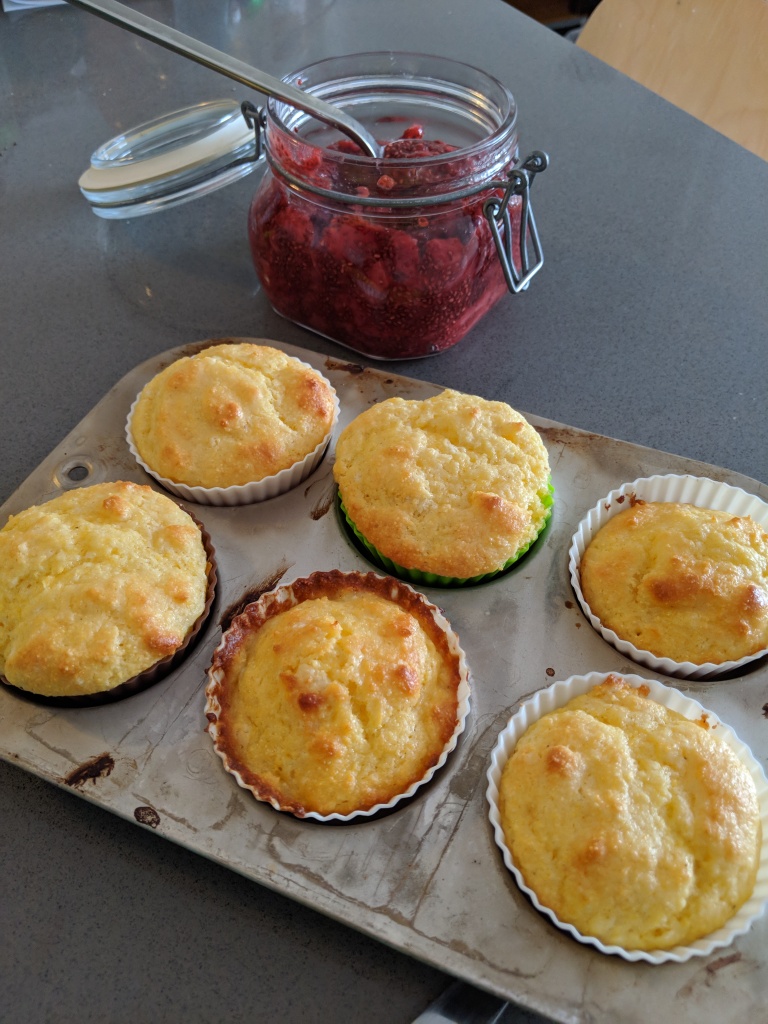
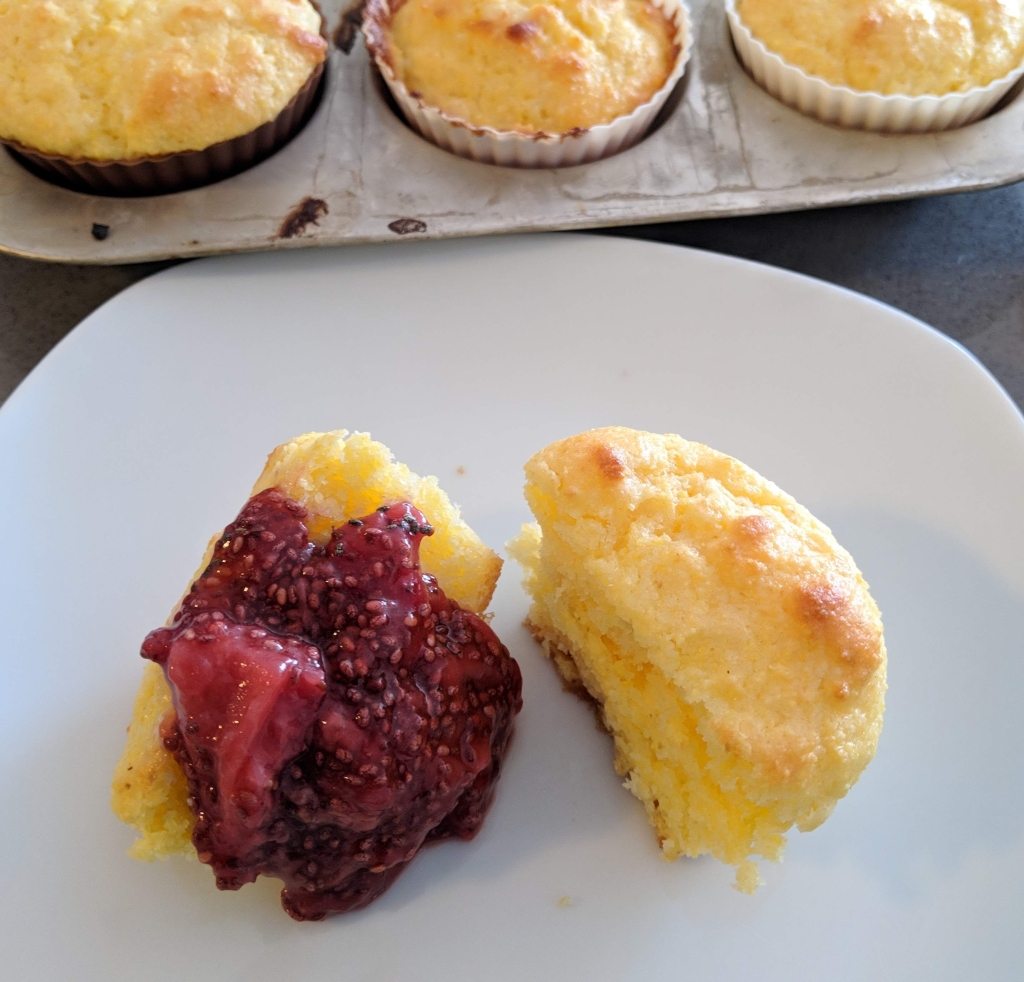
Greek yogurt in everything! I’m not sure Greek yogurt really changes the taste too much in these muffins, and it’s not packing any protein punches in this recipe, but it’s a nice swap for people like me who rarely have milk in the fridge. Pro-tip for the compote, have someone else make it while you sit on the couch yelling instructions a la Vincenzo on The Golden Girls.
Ingredients
For the corn muffins
1 box Jiffy cornbread
1 large egg
1/2 cup of non-fat Greek yogurt
For the strawberry compote
1 lb strawberries
2 oz orange juice*
2 Tbsp sugar
2 Tbsp chia seeds
Directions
Pre-heat oven to 400F. Line a muffin pan with 9 silicone muffin liners.
In a bowl, mix the box of Jiffy mix, egg, and Greek yogurt until combined.
The batter will thick and slightly lumpy.
Fill muffin liners approximately 1/2 – 3/4 full.
Bake 15 – 20 minutes or until golden brown.
While the muffins cook, prepare the compote.
Remove stems and quarter strawberries.
Place the quartered strawberries, orange juice, and sugar in a pot over medium heat.
Stir occasionally until strawberries begin to break down and the mixture thickens.
Once the compote has thickened, turn off the heat and stir in the chia seeds.
Allow to cool and serve once the chia seeds plump up!
*I used low sugar orange juice. Well, at that point, it’s probably called “orange drink”, but the label assured me it was at least 40% orange juice.
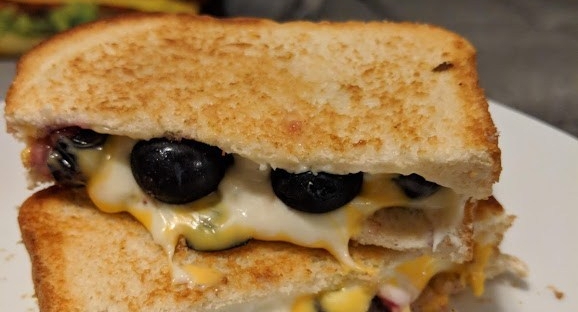
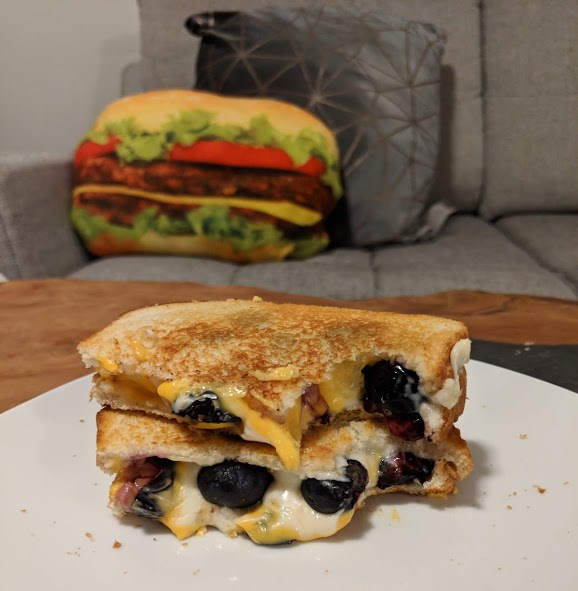
Another grilled cheese! I made this for National Grilled Cheese day. It worked out really well because now ripe blueberries are starting to appear in stores and they are on sale. All the flavors work well together. Even the American cheese. As a matter of fact, the super meltiness of the American cheese keeps the blueberries from falling out of the sandwich when you flip it. And the honey, aside from tasting awesome, also helps the blueberries stick to the bread before the cheese melts. This makes a great dessert or breakfast grilled cheese.
Ingredients
2 slices white bread
clover honey
1 slice American cheese
1 slice cheddar cheese
handful of blueberries
butter
Directions
Pre-heat oven to 400F*
Butter one side of each slice of bread.
Drizzle about a teaspoon of honey on one slice of bread (non-buttered side) and apply blueberries. The honey will help them to stick. Layer a slice of American cheese on the blueberries, followed by the cheddar cheese and the other slice of bread.
Place the sandwich, buttered side down, in a cast iron skillet over medium heat. Cook 1-3 minutes until cheese starts to melt and bread toasts, then flip and repeat on the other side.
Transfer the sandwich into the oven, (or place on your now hot cyookie sheet!)
Bake about 5 minutes. The blueberries will start to roast.
Slice, admire the purplish roasted blueberry juice and cheese pull, then devour.
*If you don’t have a cast iron skillet, or don’t want to use one, place a baking/cookie sheet in the oven at this point. Let it get hot!